Showing posts with label Decorating. Show all posts

Distressed Wood Chevron Wall Decor

Wednesday, October 8, 2014


One of our latest projects was creating some wooden arrows to decorate above our TV.  I totally fell on the DIY pallet band wagon. Free? Yes! Distressed? Yes! We got two pallets and went straight to work...

...for about 10 minutes. Have you ever tried to deconstruct a pallet? No? Well it is incredibly difficult and not to mention dirty and gross. If I was going to have hubby's help with this project I needed to make a change. Straight to Lowe's we went to see what our options were. We looked around for a little bit and weren't liking what we saw. Then we stumbled upon these packs of cedar wall paneling and they were perfect! Like only $10 perfect! We were planning on making 9 chevron arrow things and these ended up being the exact amount of material that we needed. I think they came as a pack of 6 boards that were 8 ft long. Hubby cut them to the correct length and then mitered all of the ends at 45 degrees.

Freshly cut and ready to be distressed
First I stained the back side of them with some Rust-oleum wood stain in Kona. The fronts are smooth and finished but the backs are rough and unsanded - the look that I was going for. I have no idea what the proper way to stain stuff is so I just used a foam brush to paint it on then waited various amounts of time before I wiped it off with a rag :)

You'll need three foam brushes- one each for stain, paint, and glue

After one coat

Next I watered down some grey paint samples that we had leftover. I followed the same process as the stain. On some of the sections I did two or three coats and on others I did just a very very light coat and immediately wiped it off.

Some boards with the grey paint wash - waiting to be wiped off
 
I glued 4 pieces of varying finishes together - two interlocked on top and bottom and then down the middle. I used some of the scraps that we had from the miter saw to serve as a sort of backing plate. This got glued to the back to keep everything together. (Wood glue and cameras don't mix so I don't have any pictures of this part. I'm a messy DIYer)

Our initial plan was to just use double sided tape to secure these to the wall (they are super lightweight.) We decided to nail them in after they were positioned on the wall for extra support... I didn't want them falling off the wall in the middle of the night a few months from now.

You can see the scrap that I glued to the back to keep everything together and the tape pieces.

For a total cost of less than $20 I'd say it is a success!


Once we install our sound system I think we are going to mount our TV to the wall and hide the cords. Hooray for progress! It is so nice to not have that big empty space above our TV anymore.

Burlap Wreath DIY

Wednesday, September 10, 2014

My most recent project was making a new fall wreath for the front door. I previously made this Fall Berry Wreath for our old apartment. Our house has a much larger front door and that wreath was itty bitty on our door. It will find and new home inside.

Even though it is still in the 90's here in Austin, all of my friends and family's posts from back home talking about boots and apple picking has got me in the fall mood.

Disclaimer: there are probably much better tutorials for making burlap wreaths out there. This is just the way I made mine and I can't guarantee that it is the best or easiest way!

To make this wreath I started with:
     -A wire wreath frame
     -Wire rimmed burlap ribbon (4 rolls of 15 ft - more or less depending on the size of your wreath)
     -Pipe cleaners (coordinating with the ribbon you choose)

I ended up wanting to add a little fall banner so I used some scrapbook paper and jute that I had on hand.


To start the wreath I tied up the end of the ribbon with a pipe cleaner. I connected it to the underside of the wire frame at one of the crossbeams. After it was secured I just started pulling up sections of burlap from the underside through the top to make these burlap poofs. I found it easiest to unroll all of the ribbon and have it hanging under the wreath. It only took around 20 minutes to pull all of the ribbon through this way.


I didn't measure the poofs or secure each one. I just worked my way through the different sections until I had it as full as I wanted. Once I reached the end of the ribbon roll I secured it with a pipe cleaner. Boom. Done!


Almost... haha. It was looking a little plain and I didn't want to add some flowers or an initial so a banner it was. I used my Silhouette Cameo to cut the banner shapes and letters. A little glue and some jute later... Happy Fall Y'all!


Bonus picture of Phoebe in the window.

I'm so happy with the way this wreath turned out! Bring on the boots, pumpkins, and apple cider.

Fall Berry Wreath - DIY

Thursday, October 13, 2011

We needed a fall wreath for our door. A couple weeks ago I found some berry stems from Michaels that I bought to put in a vase inside. They make me happy so I decided they would be perfect to make a wreath out of.


I bought 9 more berry stems ($1 each), some 18 gauge wire wrapped in paper ($1.99), and some orange ribbon ($1) to make this project. If you have an old wreath that you could repurpose, use that - I didn't so I got the wire to make the frame for the wreath.


DIY Sparkly Pumpkins - Tutorial

Wednesday, October 5, 2011

We really needed some fall decorations around these parts. Since we were in school last year we really didn't decorate our old apartment... at all.

For our new home I wanted some glamorous pumpkins. Can pumpkins be glamourous?  I don't see why not. I saw a white pumpkin at TJ Maxx awhile ago that was covered in glass beads and sparkles. I loved it but I didn't want to spend $20 on a fake pumpkin.

So I waited and looked around for some plain white (fake) pumpkins. Hobby Lobby was a big disappointment when it came to plain pumpkins so I headed over to Michael's. I found a plain white pumpkin, 50% off, for $4. Not bad. A little glue and epsom salt later - this is what I ended up with.


So you want to make one? Here is what you will need.

Super Easy Canvas Art

Tuesday, October 4, 2011

We needed some artwork for over our bed - artwork that wouldn't cost very much. What is a girl to do? Go to Hobby Lobby of course! I picked up three square canvases along with some green paint. Here is the finished result:


Custom lamp base - Paint it!

Thursday, September 29, 2011

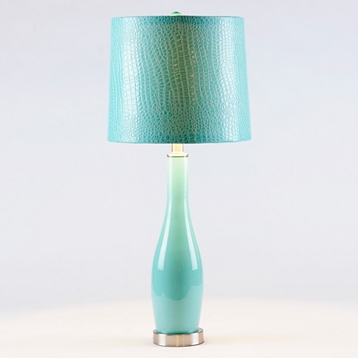
So how in the world do you find the perfect lamp base... the perfect blue lamp base. If you are me, you stumble upon beautiful blue lamps (for under $25!) and immediately order two. Wait anxiously for your beautiful lamps to arrive.


Now this step is very important: open up the package when they arrive and be super disappointed when one is smashed to pieces. Become even more disappointed when you find out that they have zero left and can't send you a replacement.

It was really difficult to find other blue lamps for a reasonable price... almost impossible. Since we really needed the extra lighting in our living room I decided to take matters into my own hands. On Pinterest, I saw that you could paint small glasses and vases by swirling paint around the inside.

Enter IKEA.

They have big, clear, glass lamps with a big hole for the bottom. These beauties are pretty much screaming to be painted.

Before.

Low cost, big impact

Friday, September 16, 2011

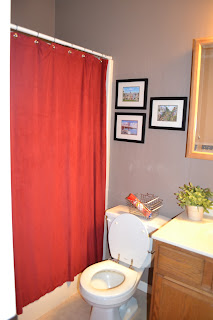
So while I was back in Bethalto last week I really wanted to update the downstairs bathroom in my parent's home. This use to be my sister's and my bathroom. At one point it was painted an almost neon yellow color. Then we switched it to a more muted color palate with a pop of red. Somewhere along the line we messed up and took a shower too soon after we painted and ended up with streak marks in the paint. Since Amanda and I no longer live at home and this is the third bathroom in the house, it was feeling a little neglected.


It is amazing what a little bit of paint can do for a room. Mom and I painted the bathroom a light tan color and painted the vanity black. Amazing!

The many uses of toilet paper rolls.

Tuesday, August 30, 2011

So awhile ago my cousin, Jessica, posted a picture of toilet paper roll art on her blog, My Cute Little Life. I did a google search for more ideas of toilet paper roll art and decided that it would be the perfect medium for decorating our living room wall. Now this wall in the apartment is kind of large and I wanted something to span the whole length. So we ended up getting 4 canvases to hang equally spaced along the wall. By the way, Hobby Lobby is the place to go for canvases. The canvases we got came in packs of two and are super cheap when they are on sale 40% off or if you use one of their 50% coupons.

Here are the steps to do a project like this:
1. Depending on your design, you may need a lot of toilet paper rolls. Ask friends and family to save up toilet paper rolls and paper towel rolls for you. (You will probably get some funny looks.) Explain to them what you are going to do with the rolls and get a few more funny looks.


Split peas and a registered nurse

Thursday, August 4, 2011

Did I tell you all that I passed the NCLEX? Well I did... back in June. I have been waiting all this time for my Texas nursing license to come. So this entire time even though I knew I was on my way to becoming a nurse, it wasn't official yet. But yesterday I finally got an envelop from the state of Texas that contained my license. So I am now officially Erin Davis R.N., BSN. * jumps for joy* Now the job hunt is officially on. Hopefully I won't have too hard of a time finding something that is a good fit for me. I will keep you posted.

On a completely different note. Split peas. These little guys are my new favorite decorative filler. At less than a dollar per bag they are great for filling up large vases. I also really like how they look compared to marbles or rocks. Currently they are filling up space in three vases on our living room mantle shelf thing and in two smaller vases in our bedroom.


These vases were left over from my bridal shower centerpieces. In our last apartment they were filled with flour, sugar, and pasta but we didn't really have the space to use them like that in our new place. So they ended up empty on this ledge just to get them out of the kitchen. I had been debating on whether or not to keep them or replace them with candlesticks or hurricane vases. I just didn't like them with the lids on and I didn't like them with the lids off because you could see the threads and that they were meant to have a lid. To solve that problem I wrapped the top of the vases with jute to cover up the threads and I am super pleased with how it turned out. I like how natural the look is and I am really enjoying having the candles lit in the evening.


Now I have to admit that this was not an original idea of mine. I saw the split peas in a couple of different places on Pinterest as suggestions for fall decor and the twine was originally shown wrapped around the middle of flower vases as a diy wedding centerpiece. I love the combination together and how I didn't have to purchase new vases for the ledge.

Have you heard of Pinterest? It is only my absolute most favorite website right now. It is a website that is like a huge photo catalog with links back to interesting stuff on the internet. Currently I am pinning a ton of craft projects, recipes, inspiration for home decor, and fashion inspiration. Oh how I wish I would have known about Pinterest when I was planning our wedding. It is seriously awesome. You can click here to see my pinboards and look around. Let me know if you like the site and think you would use it... I can send you an invite.


Favorite project to date

Friday, July 15, 2011

A while ago I got this idea to change a picture frame into a chalkboard frame and use it in the kitchen. I had a picture in my mind of the perfect frame and wanted one of those really chunky ornate ones. Since we have moved into this apartment I have been looking all over for the frame but couldn't seem to find the right one. Will put his foot down and said no to this one from IKEA.

And honestly it wasn't quite what I was looking for and the $30 price tag seemed a little high for an IKEA find. Also, Will didn't like the chalkboard idea and instead wanted to use dry erase board which I wasn't really too fond of. So I started feeling like this project was never going to happen and the wall in my kitchen would forever be bare. But then I spotted it! I was walking through the aisles of Hobby Lobby and found this adorable cork board with a great frame. Bummer that it was a cork board and not a picture frame though.


 After a little investigation it turned out that it actually was a picture frame but instead of putting glass in it they replaced it with cork. So I went to their framing department and had them cut a piece of glass to fit. A quick stop by the fabric department for some burlap and voilĂ ! I decided to paint the frame green to give a nice pop of color in the kitchen.


Don't be fooled by the picture. This job definitely should have been done with spray paint but I don't really have an ideal place to spray paint and didn't feel like carrying the whole project down to the grass in the Texas heat. So after many coats, throwing away many cheap paintbrushes because they left bristles behind, a trip to the store to get a better quality brush, and a coat of protective enamel it was finished! 


Right now it is being used as a to do list and a place to write down things that I need to get. When we have guests over I write the menu for the night on it.


There it is in our apparently very dark kitchen. Hmm I really should take better pictures of my projects.

Welcome to our home!

Friday, July 8, 2011

I am going to start posting pictures of our apartment and the projects that I have been working on to make this apartment feel more like our home. "But Erin, how do you have time to work on these projects and get back to blogging?" you ask. Why because I passed the NCLEX! Yep, no more studying for me. Now I just need to find a job.

So one of the first projects I made for this apartment was a picture for the entryway. I wanted something simple and that would be easy to do. This is what it turned out to be:


Sorry that the pictures aren't very good. It is in a funny corner to photograph and right next to a window. I just love how this turned out and it was so simple to make! I took a picture frame with a mat from IKEA, some fabric, and a piece of tan cardstock and made this in just a few minutes. Will and I created the monogram on our computer and printed it out. I lined that up on the fabric and used a little hot glue to keep it in place. I centered the cardstock and fabric in the picture frame and Hubby hung it up for me. That was all it took to add a little welcome to our apartment.
Related Posts Plugin for WordPress, Blogger...